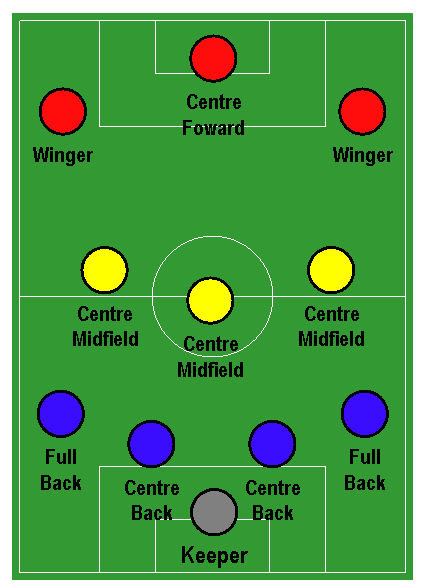

A soccer formation describes how a team places its outfield players, usually from defense to attack. In 11-a-side soccer, the 4-3-3 has four defenders, three midfielders and three forwards; the goalkeeper is not included in those numbers. It can create width and pressing options, but it is not automatically better than a 4-4-2 or 4-2-3-1. The right shape depends on your players, opposition and how you want to defend.
This practical guide compares four common 11v11 formations, explains where players actually move, and gives drills and match-day decisions a youth or amateur coach can put into practice. A formation is a starting framework, not a promise that every player will remain on a painted dot.
Soccer formations at a glance
| Formation | Best starting strength | Main vulnerability | Good for |
|---|---|---|---|
| 4-3-3 | Width, three-player midfield and front pressing | Space behind attacking fullbacks | Teams with confident midfielders and wide forwards |
| 4-4-2 | Clear lines and two forward outlets | Only two central midfielders against some shapes | Teams learning compact team defending |
| 4-2-3-1 | Two midfield screeners and a creative number 10 | Striker isolation if the attacking midfield line is slow to support | Teams that need a stable platform for a playmaker |
| 3-5-2 | Three central defenders and two central strikers | Wingbacks must cover substantial ground | Teams with energetic wingbacks and strong center backs |
The labels describe the outfield starting structure, not different numbers of total players. For example, a 4-2-3-1 still uses ten outfield players. Actual defensive structures can change with the ball: a 4-3-3 may defend in a 4-1-4-1 or a 4-5-1, while a 3-5-2 can become a back five.
How the 4-3-3 works
Picture two center backs between two fullbacks, a midfield holding player behind two more advanced midfielders, and three forwards spread across the front line. This is one common version, often called a single-pivot 4-3-3. Other versions use a different midfield triangle.
Diagram: Mario Ortegon / Wikimedia Commons, CC BY-SA 3.0, unchanged. Original file.
Defenders and fullbacks
The center backs protect the middle, organize the line and begin attacks with passes or carries. Fullbacks must judge when to join the attack. If both advance high at once, a turnover can expose the channels beside the center backs. A practical starting rule for a developing side is to let one fullback advance while the far-side fullback stays more conservative, unless the whole team has rehearsed a different structure.
The three midfield roles
The deepest midfielder, frequently called the number 6, screens the defense and offers a safe pass out of pressure. The two players ahead, often called number 8s, help progress the ball, find spaces between lines and counterpress when possession is lost. If all three stand on the same horizontal line, defenders may struggle to find forward passing lanes. Stagger their positions so the player on the ball sees a safe short pass and a progressive option.
Wingers and striker
Wingers stretch the field or come inside to combine. The center forward occupies central defenders and can press the first opponent in the build-up. A wide attacker moving inside often creates room for an overlapping fullback—but the team needs a plan to protect the vacated area if the ball is lost. Do not order every wide player to stay glued to the touchline; their movement should answer where the ball and defenders are.
How to build from the back in a 4-3-3
Begin with the goalkeeper and center backs. The holding midfielder should provide a passing angle, not stand directly behind an opponent. The far-side defender and midfielder adjust to offer the next pass after pressure arrives. Against a high press, playing around or through the first line often works better than forcing a risky ball into a marked player.
FIFA’s 4-3-3 attacking session demonstrates coordinated midfield movement and switching play against pressure. Its lesson is transferable: create multiple routes, keep midfielders moving and recycle possession when the forward pass is not available.
What a 4-4-2 does better
A 4-4-2 gives inexperienced groups relatively clear jobs: two compact banks of four in defense, with two forwards ready to press or receive passes. It can suit a team with two complementary strikers and wide midfielders willing to track back. The challenge comes when an opponent places three central midfielders against two; the wide players or strikers must help close central passing lanes.
When defending a narrow lead, focus less on changing the numerical label and more on distances: the back four, midfield four and forwards should stay close enough to offer mutual support. A compact 4-4-2 is difficult to play through; a stretched 4-4-2 can be easy to exploit.
When a 4-2-3-1 makes sense
This formation keeps two deeper midfielders behind three attacking midfielders and one center forward. The double pivot can provide a stable passing platform and cover during transitions, particularly when one midfielder carries forward and the other holds. The number 10 should connect the midfield to the striker. If the wide attackers fail to advance, the lone center forward can become isolated.
For a youth team moving from a 4-3-3 to a 4-2-3-1, changes may be smaller than they first appear: one central midfielder drops next to the holding player while another operates higher. Explain those individual responsibilities instead of demanding a completely unfamiliar formation overnight.
When to choose a 3-5-2
With three central defenders, five midfielders when in shape, and two strikers, a 3-5-2 creates central numbers and two advanced outlets. Wingbacks give the structure width, but they must recover quickly whenever possession changes. It is a poor fit if nobody has the stamina or awareness to own those wide corridors. For teams learning the shape, assign clear cues for who closes the opposing winger when one wingback is caught upfield.
Comparing a 4-3-3 with a 4-4-2 against an opponent
| Match situation | 4-3-3 response | 4-4-2 response |
|---|---|---|
| Opponent has three central midfielders | Match them with your midfield trio and find staggered angles | Ask wide midfielders or a forward to help deny central passes |
| Opponent presses high | Use the goalkeeper, number 6 and switching play | Use clear passing exits toward either striker and supporting midfielders |
| Opponent leaves space wide | Release winger or fullback while protecting the far side | Use wide midfielder combinations with fullback support |
| Your team is exposed to counters | Hold the number 6 and avoid both fullbacks pushing without cover | Shorten the distance between defenders and midfielders |
Simple soccer formation exercises for amateur teams
Exercise 1: Passing triangles
Mark a small grid and use three attackers versus one defender. The ball carrier needs two visible options. Rotate the defender and ask players to create new angles instead of standing behind one another. This introduces the passing habits required by a midfield three.
Exercise 2: Wide overload and recovery
Put a winger, fullback and midfielder against two defenders near the touchline. Let the attacking trio combine toward a crossing area. On a turnover, freeze briefly and ask: who covers the empty fullback channel? Restart and reward quick recovery rather than only successful crosses.
Exercise 3: Shape without the ball
In a half-field exercise, have the defending team shift sideways as the attacking team moves the ball from flank to flank. Stop when there is a large gap between midfield and defense. Coach spacing before speed. This matters whether your whiteboard says 4-3-3, 4-4-2 or 4-2-3-1.
Which formation is best for 7v7 or 9v9 soccer?
Do not copy an 11v11 label literally into a smaller game. A common 7v7 framework is 2-3-1: two defenders, three midfielders and one forward, plus a goalkeeper. A 3-2-1 can offer more security across the back. For 9v9, 3-2-3 and 2-3-2-1 create different balances between central control and width. League regulations and goalkeeper rules determine the exact player count, so check the competition before planning.
For developing players, rotating positions can build understanding of the whole field. Evaluate whether the players recognize defensive cover, passing triangles and width instead of declaring a successful formation only because one weekend ended in a win.
Where positions sit on the soccer pitch

Pitch diagram: Ed g2s / Wikimedia Commons, CC BY-SA 3.0, unchanged. Original file.
Soccer formations FAQ
Does the goalkeeper count in a 4-3-3?
No. Formation numbers list ten outfield players in 11v11 soccer. The goalkeeper is the eleventh player.
Is 4-3-3 an attacking formation?
It provides three natural forward positions and width, but it can also be organized defensively. What the players do without the ball matters as much as the starting numbers.
Which formation is easiest for beginners?
A compact 4-4-2 is often simple to describe and rehearse, but a 4-3-3 can also be useful for teaching triangles and positional rotations. Choose a shape that matches your actual roster and training time.
Is 4-2-3-1 more defensive than 4-3-3?
Not necessarily. The double pivot offers cover, yet a number 10 and two aggressive wingers can create an attacking structure. Coaching instructions and player movement are more important than the formation alone.
Can a team switch formations mid-match?
Yes. Teams regularly change shape in possession, out of possession and after substitutions. Practice a few simple cues so players know when a teammate’s movement changes their responsibility.
Editorial note: This is an original tactical explainer, not a real-time ranking of teams. For more detailed tactical coaching exercises, visit the FIFA Training Centre. To understand one rule that influences attacking runs from every formation, see our Football (Soccer) section and the offside explainer there.

Other Articles

Soccer Offside Rule Explained: Examples, Exceptions and VAR (2026)
Tennis Scoring Explained: Love, 15, 30, 40, Deuce & Tiebreaks