
Quick answer: Good freestyle swimming technique starts with a long, balanced body position. Look mostly downward, rotate the torso gently as each arm reaches, move the water backward with your hand and forearm, kick from your hips, and exhale steadily underwater. When you need air, roll your face to the side with the body instead of lifting your whole head. A useful first practice session alternates one correction drill with an easy full-length swim.
Freestyle usually means the front crawl when people discuss swim technique. The name is not a promise that one body position works for every swimmer. The right goal is to reduce unnecessary drag while maintaining comfortable breathing and a repeatable stroke. The following progression is designed for adults who already know how to float and swim a short pool length safely. It is not a substitute for lessons or supervision for a non-swimmer.
The six parts of an efficient freestyle stroke
| Part | Useful cue | Common mistake | What to try instead |
|---|---|---|---|
| Head and balance | Gaze mostly at the pool floor | Looking forward and lifting the chest | Let the neck stay relaxed; check whether hips rise. |
| Hand entry | Enter in line with each shoulder | Hand crossing the head’s centerline | Visualize two separate swimming lanes for the hands. |
| Catch and pull | Use forearm and palm to press water backward | Pressing downward with a stiff straight arm | Bend the elbow gradually beneath the surface. |
| Body rotation | Shoulders and hips rotate together | Swimming completely flat or rocking from side to side | Use gentle long-axis rotation tied to each stroke. |
| Kick | Small flutter kick initiated at the hip | Bicycle kicks from the knees | Keep ankles soft and kicks compact near the surface. |
| Breathing | Exhale underwater; turn low to inhale | Holding air and lifting the entire head | Begin exhaling after your face returns to the water. |
The key is one change at a time. If your breathing collapses when you work on the catch, improve breathing first. A harder or faster kick is seldom the most efficient answer to sinking legs caused by lifting the head.
Step 1: Find a comfortable horizontal body position
Start by floating face-down only if you are comfortable and safe doing so, with a lifeguard or qualified supervisor available. Extend your arms ahead, allow your body to stretch long, and look down toward the pool bottom rather than forcing your eyes to the far wall. Keep the neck relaxed. The aim is a position where your hips and legs remain near the surface without a frantic kick.
Diagnostic drill — streamline push and glide: Gently push from the pool wall in shallow or appropriate-depth water with arms extended, then stop and stand safely. Notice whether the legs fall quickly as the head rises. Repeat with a quieter head position. Do not hold your breath for extended periods or push off underwater beyond your ability.
U.S. Masters Swimming emphasizes that horizontal alignment is a foundation for freestyle, while acknowledging that ideal head position varies between individuals. Do not copy an elite swimmer’s exact posture if it causes discomfort. See its freestyle technique guide.
Step 2: Enter the hand ahead of the shoulder, not across your face
Let the recovering arm swing forward in a relaxed manner and place the hand into the water roughly in line with that shoulder. Extend forward without reaching so far that you twist your body or cross the centerline. Imagine each hand is following its own narrow lane toward the wall.
Diagnostic drill — fingertip drag: On a short easy length, let the fingertips skim the water during arm recovery. This encourages a relaxed, compact recovery and gives you time to monitor the entry. If it feels awkward or causes shoulder strain, reduce the amount of dragging. The drill is an exercise, not how you must swim every length.
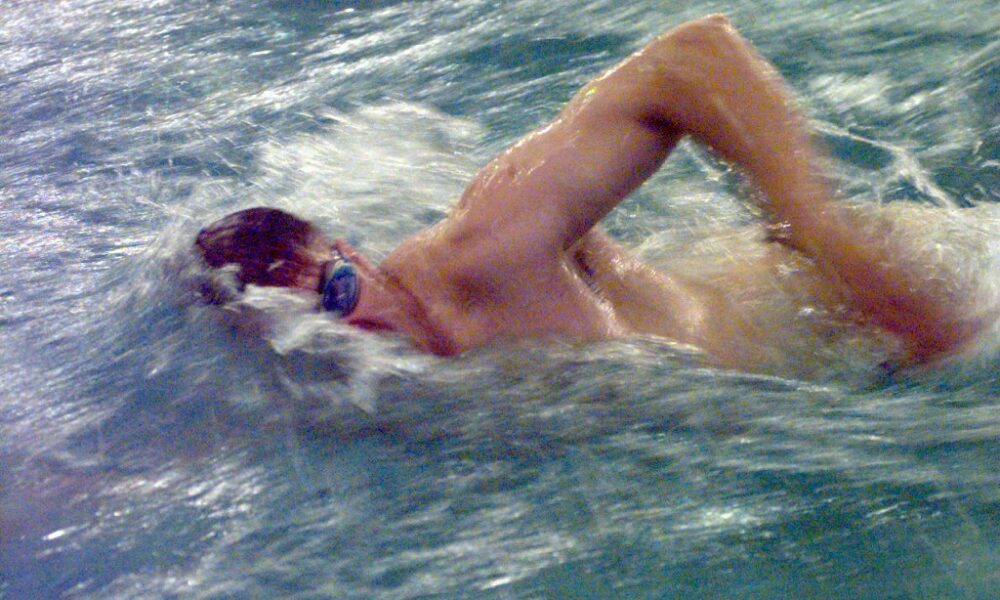
The actual front-crawl swimmer in this article’s featured photograph illustrates the moving recovery arm and head turned for air; it is a real U.S. Army pool image rather than an instructional diagram.
Step 3: Create a catch that sends water toward your feet
Once a hand has entered and reached forward, direct the hand and forearm so they can move water back. Think about maintaining a useful elbow bend rather than reaching straight toward the pool floor and pushing down. Accelerate gently through the stroke; do not jam the shoulder forward or force an extreme high-elbow position.
Diagnostic drill — short scull: In water where you can stand safely, move the hands side-to-side just below the surface with controlled forearm pressure. Then swim one easy length and pay attention to the feeling of water against the forearms. If you feel the hands slipping rather than gripping, slow down and focus on alignment before adding force.
The underwater image below captures the long forward reach of a real freestyle swimmer. It is a single moment in the stroke, not proof that the athlete uses one universally correct technique.

Step 4: Rotate through the torso without swaying off your line
Freestyle is not a fixed, face-down plank. Your trunk rotates naturally around its long axis as one arm enters and the other finishes its pull. This helps the reach, the catch and breathing. Over-rotation, however, can leave you unstable and cause the recovering arm to cross in front of your head.
Diagnostic drill — side-kick: Swim a short section with one arm ahead and your body gently angled to that side, then switch sides. If you cannot hold a relaxed balance or breathe normally, use a pool-side coach and a simpler supported float drill first. Do not extend underwater swimming for the sake of staying on your side.
Step 5: Use a compact flutter kick, not a bicycle kick
The kick helps sustain body alignment and can provide propulsion, but very large kicks usually waste energy and increase drag. Let the motion begin around your hips, keep your knees loose rather than locked, and allow small, quick movements near the surface. If you are training for distance, it is fine to use a less intense kick than a sprinter; there is no universal stroke-to-kick ratio for every person.
Diagnostic drill — 4 × 25 easy kick awareness: Swim or kick the first quarter length with a slow gentle motion, then briefly compare it with a faster but equally compact kick. Notice which one keeps your hips comfortable without breathlessness. Never use a kickboard that makes you lift your neck into an uncomfortable position.
Step 6: Breathe to the side without lifting your head
Exhale steadily with your face in the water, then use body rotation to bring your mouth just clear of the surface. A common visual cue is one goggle close to the water and the other nearer the air. Finish the inhale promptly and return the face before the recovering hand swings ahead. Do not turn so far that you end up staring at the ceiling.
Is breathing every three strokes better than every two?
Not necessarily. U.S. Masters Swimming says both one-sided and bilateral patterns can work. Someone who needs more air may prefer a breath every two arm strokes; another swimmer may choose every third stroke to alternate sides. The best rhythm is one that gives you adequate air without breaking balance. Do not practice prolonged breath-holding or deliberately withhold air to imitate a sprinter.
Diagnostic drill — wall bubbles: Hold a pool wall in water where you can stand. With supervision if needed, put your face in the water briefly and breathe out in a gentle stream of bubbles; stand and take a normal inhale when ready. Progress to one easy swimming length, breathing when needed. Consult the U.S. Masters Swimming breathing guide for a detailed explanation of timing.
25-minute freestyle technique session for a beginner swimmer
This is a suggested practice schedule, not a tested performance protocol. It assumes you can already cover short lengths without distress. Take more rest whenever needed; a swimming instructor can adapt distances and duration.
| Time | Practice | What to notice |
|---|---|---|
| 0–4 min | Easy swimming or comfortable water acclimation | Calm exhale; relaxed pace. |
| 4–8 min | Two or more short lengths alternating gentle glide and easy freestyle | Head and hip alignment. |
| 8–12 min | Fingertip-drag drill, then one easy normal length | Hand entry aligned with shoulders. |
| 12–16 min | Short sculling practice, then normal freestyle | Forearm pressure backward. |
| 16–20 min | Easy side-balance work and short full-stroke practice | Rotation without zigzagging. |
| 20–23 min | Three short, relaxed freestyle efforts with ample rest | Breathing that stays controlled. |
| 23–25 min | Gentle cool-down and written notes | One improvement and one fault to address next time. |
Never rush the schedule to meet an exact number of lengths. If breath control is difficult, spend more time on safe wall-supported breathing or work with an instructor instead of repeatedly swimming through distress.
How to measure progress without guessing at swim speed
Pick one pool length and swim it at a comfortably repeatable effort once or twice per week. Record the number of arm strokes, approximate time and perceived effort on a simple 1–10 scale. If the stroke count falls while time and effort remain similar, you may be swimming more efficiently—but that is a hint, not proof of improved technique. Changes in push-off force, fatigue or how you count strokes can alter the results.
| Week | One technical focus | Easy progress check |
|---|---|---|
| 1 | Body line and safe rhythmic breathing | Can you complete a length without lifting your chin? |
| 2 | Hand entry and relaxed recovery | Do your hands remain in shoulder-width lanes? |
| 3 | Catch and controlled rotation | Does the stroke stay steady without rocking left/right? |
| 4 | Combine one or two corrections | Compare easy length time, stroke count and comfort. |
A friend recording a short video with permission and the pool’s rules observed can reveal a crossover or head lift that is difficult to feel. You do not need to film underwater or use specialized equipment. A qualified swim coach is the more reliable option for detailed stroke corrections.
Quick fixes for six common freestyle problems
My legs sink whenever I breathe
First look at whether you raise the entire face out of the water. A smaller side-turn combined with steady underwater exhalation often makes maintaining horizontal alignment easier. Do not compensate by kicking frantically.
I get exhausted after one length
Check that you are not holding your breath and racing every stroke. Reduce pace and shorten repeats. A comfortable exhale and rest breaks usually matter more than extending distance. Stop if you feel dizzy, chest pain or unusual breathlessness.
My shoulders hurt during the catch
Stop the painful motion. Avoid forcing a large elbow bend or extreme reach. Persistent pain warrants assessment by an appropriate clinician or qualified coach; this article cannot diagnose an injury.
My arms cross over in front of my head
Visualize two tracks shoulder-width apart and slow down the recovery. Try a short fingertip-drag drill while keeping the torso centered.
My kicks create a lot of splash but little movement
Try smaller movements initiated at the hip with relaxed ankles. There is no advantage to a violent kick if it destabilizes the stroke.
I can’t breathe every three strokes
Use a rhythm that lets you breathe comfortably, including every two strokes if needed. Alternating sides is useful practice but not a reason to restrict breathing.
Safety notes: technique practice is not underwater endurance training
Swim at a supervised pool, stay in conditions appropriate to your skill level, and take breaks before fatigue makes breathing or judgment difficult. Do not hyperventilate or practice extended breath-holding. If you cannot comfortably submerge your face or swim a short distance, get in-person beginner swimming lessons before attempting the full session above. Parents should provide constant appropriate supervision to children; a lesson plan is not a water-safety system.
For readers who rotate sports in a weekly skills routine, AVARIXO also offers a separate volleyball practice plan for beginners. It is a cross-training option, not a replacement for swimming instruction.
Freestyle swimming technique: FAQ
Is freestyle the same as front crawl?
In everyday coaching, freestyle generally means the front crawl stroke. In a freestyle race, competition rules allow different styles, though front crawl is the standard competitive choice.
Should the head look straight down?
A mostly downward gaze often helps alignment, but the precise angle varies between swimmers. The more useful test is whether your neck stays comfortable and your hips remain high without excess kicking.
Should a beginner kick six times per stroke cycle?
No fixed count is required to practice useful freestyle. Some swimmers use two, four or six kicks per complete two-arm cycle. Begin with small balanced motions and choose the rhythm you can sustain.
Which freestyle drill should I start with?
For a swimmer comfortable in water, begin with relaxed floating and exhaling, followed by an easy length. The best drill depends on the problem: side-balance for body line, fingertip drag for recovery and gentle sculling for catch awareness.
Can I learn freestyle without a coach?
You can understand the mechanics through guides, but an instructor is invaluable for spotting faults and ensuring water safety. If you’re not yet a safe independent swimmer, start with supervised instruction.
How quickly will my freestyle improve?
There is no reliable universal timeline. Practice quality, previous swim experience, mobility and coaching all matter. Track one skill at a time rather than trusting claims of instant speed gains.
Editorial verification: October 14, 2026. Technique was cross-checked against U.S. Masters Swimming’s freestyle guide, its breathing guide, and swimming stroke basics. This is instructional synthesis; AVARIXO did not claim to test the drills or measure outcomes.

Other Articles

Jujutsu Legacy Codes (October 2026): Free Spins and Redeem Steps
